Sunday, September 25, 2022

Halloween Animated Scene

 (MrQ Halloween animated scene.py)

Author: MareroQ

This plugin was inspired by the three Pocholo plugins:
pm_animated_dancing_ghost.py located here: http://gimpchat.com/viewtopic.php?f=9&t=20106
pm_create_a_halloween_scene.py located here: http://gimpchat.com/viewtopic.php?f=9&t=19656
pm_halloween_graveyard_scene.py located here: http://gimpchat.com/viewtopic.php?f=9&t=20126


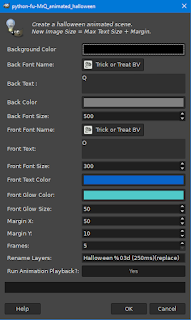
In menu: Filters ➤ Animation ➤ Halloween animated scene...

Create a halloween (although it all depends on the font type dingbat used) animated scene.
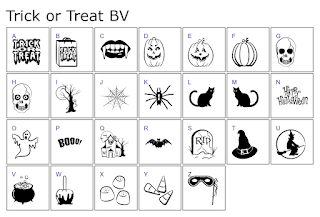
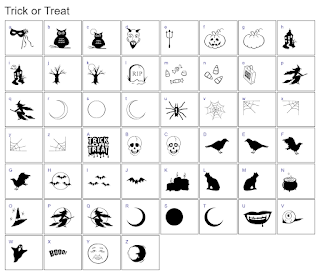
For halloween recommended use font Trick or Treat (free for non-commercial uses).
 
You must have G'MIC installed.
 
 Scroll bar for Python plugins here.


Ver.0.1
(Initial relase)


Ver.0.2
(01/10/2022)
Changes:
-added new type animation: "Sliding","Ripple & Sliding", "Crease". 

"Sliding"

 
"Ripple & Sliding"

 
"Crease"


Ver.0.3
(02/10/2022)
Changes:
-added new type animation:"Shrink","Rotate",
-added new options "Reverse Frames" and efect "Ping-Pong".


"Shrink"


 "Shrink + Ping-Pong"

 "Rotate"


Ver.0.4
(04/10/2022)
 
Changes:
-added new type animation: "Deform","Edges on Fire","Typewriter" (using code by Tin Tran character-layers-from-text.py),
bug fix (06/10/2022) for animationplay (invalid ID for argument 'drawable').

"Deform"

"Edges on Fire"

"Typewriter"

 
Note: the plugin will be continued soon as an MrQ Animated Scene.

Saturday, September 24, 2022

Color Balance & Brightness-Contrast

 (MrQ C-B & B-C.py)

Author: MareroQ

In menu: Colors ➤ Color Balance & B-C...

The Color Balance plugin modifies the color balance of the active layer.
You can use simultaneously by using the sliders Transfer: Shadows (darkest pixels), Midtones (midtones) and Highlights (brightest pixels).

In the standard Gimp plugin, you can only select one of them in turn.

 
 Overall, the B-C (Brightness-Contrast) tool is great for "fast and dirty" adjustments in seconds,
while the changes in Color Balance are not drastic (suitable for correcting dominant colors in digital photos).
Now you can select and compare or apply any combination in one plug.


Wednesday, September 21, 2022

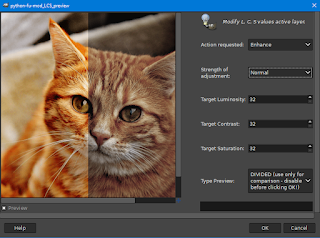
DIEGO COLOURS Modify LCS with Preview.

 (DIEGO_COLOURS_Mod_LCS-P.py)

Author: Diego Nassetti [dinasset]

Preview added by MareroQ based on Claude Lion code.
 
 
Source: GimpScriptsCom Pack 03 position 45. 
Discussion on the Gimp Chat forum here.

In menu: Diego ➤ Colours ➤ Modify LCS with preview...

This filter allows to enhance at the same time Luminosity, Contrast and Saturation of an Image.
The user sets up the “target” values and the filter can:
– either use an auto-adjustment based on the distance of current values from target
– or approaching the target in a “strong”, “normal” or “weak” action (user choice).
 
Ver.1.0 
(21/09/2022)


Ver.1.1
(22/09/2022)
Changes (made by MrQ):

- add more Preview types: Full, Forward Vertical, Backward Vertical, Forward Horizontal, Backward Horizontal. 


Tuesday, September 20, 2022

DIEGO COLOURS Transfer-Colours Ver.1.12

 (DIEGO_COLOURS_TransferColours_srgb.py)

Author: Diego Nassetti [dinasset]


Source code on Gimp Learn here.

Discussion on the Gimp Chat forum here.
 
 In Menu: Diego ➤ Colours ➤ Transfer-Colours...

Plugin returns a new image as a duplicate of the target image with colours modified according to the source image.
 
Change in Ver.1.12:
Combine into one file: DIEGO_COLOURS_TransferColours.py with required diego_stretch_rgb_colours.py.


Wavelet Sharpen Ver.0.1.2 Win_64bit

 (wavelet-sharpen.exe)

Author: Marco Rossini

Source code:  Archive GIMP Plugin Registry  https://github.com/pixlsus/registry.gimp.org_static

In menu: Filters ➤ Enhance ➤ Wavelet sharpen ...

The wavelet sharpen plugin increases apparent sharpness of an image. The amount of unsharpness in the original image can be taken into account.

From the plugin author's information:

There are two circumstances that makes it necessary to use the sharpen filter:

1. To reduce the effects due to aliasing of an picture which is in focus.
   a) Set the amount of sharpening using the slider.
   b) You may want to have the checkbox 'Sharpen luminance only' activated in order to avoid having colour artifacts (especially in noisy images).
   c) The sharpening radius can be left at 0.5.

2. To sharpen a picture which is out of focus.
   a) Set the amount of sharpening rather high (at first).
   b) Adjust the sharpening radius using the slider to choose the frequency  part in the image which is to be increased in contrast. This means for  blurred pictures you may want to set the value high (which sharpens slow-ly varying image features, leaving high frequency noise alone). Use low values if the image has many details.
   c) Set the sharpening amount back to a value that pleases your eye.
   d) You may want to have the checkbox 'Sharpen luminance only' activated in order to avoid having colour artifacts (especially in noisy images). 


Compiled for Gimp-2.10 by Samj.

Wavelet denoise Ver.0.3.1 Win_64bit

 (wavelet-denoise.exe)


Author: Marco Rossini


Source code:  Archive GIMP Plugin Registry  https://github.com/pixlsus/registry.gimp.org_static


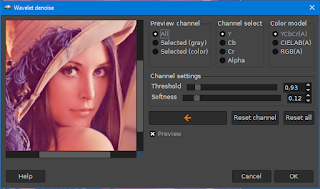
In menu: Filters ➤ Enhance ➤ Wavelet denoise ...

The wavelet denoise plugin is a tool to reduce noise in each channel of an image separately.


From the plugin author's information:

It works for both Grayscale and RGB (full colour) images, including alpha channels. The plugin dialog allows to adjust several parameters.

1. First, the choice has to be made over what colour model is to be used. There   are three possibilities (maybe there will be more in the future):

   a) RGB     (red-green-blue)
   b) YCbCr   (luminance-blueness-redness)
   c) CIELAB  (lightness-chroma)

   YCbCr and CIELAB allow separate reduction of luminance and chroma (colour) noise.

2. The preview mode can be selected. Either all channels can be selected or the current active channel which is then displayed in grayscale or colour.
3. Select the channel you want to denoise.
4. The sliders adjust the the threshold for denoising. The softness controls the softness of the thresholding. The greater the softness, the more noise remains in the image.

For camera pictures I advise to use YCbCr mode (which is nearly lossless) and to at least denoise the Cb and Cr channels to reduce the chroma (colour) noise.
Cameras shooting in JPEG mode normally have chroma noise already reduced. If desired, the luminance noise can be reduced. This channel usually contains most of the fine structures in the image and should mostly be left alone.


Compiled for Gimp-2.10 by Samj.

Wavelet decompose Ver.0.1.2 Win_64bit

 (wavelet-decompose.exe)

Author: Marco Rossini

Source code:  Archive GIMP Plugin Registry:  https://github.com/pixlsus/registry.gimp.org_static

In menu: Filters ➤ Generic ➤ Wavelet decompose ...

Decomposes the image into wavelet scales.

From the plugin author's information:

The wavelet decompose plugin decomposes a layer of an image into layers of
wavelet scales. This means that you can edit the image on different detail
scales (frequencies). The trivial recomposition of the image can be done by
GIMP's layer modes so you can see the results of your modifications instantly.
Among the applications are retouching, noise reduction, and enhancing global
contrast.

Wavelet scales:

An image can be transformed into a set of wavelet scales. There are detail
scales and one residual. The detail scales contain the image details of a their
scale size. This means that scale 1 contains only image details of the smallest
scale. Scale 2 details are larger and scale 3 details even larger (and so on).

This plugin computes these scales and creates a new layer for each one. The
recomposition is the addition off all scales which is done by GIMP using the
grain merge layer mode. You can then paint the scales with your favourite tool,
using (128,128,128) as neutral colour (for the details, not the residual).
Values below neutral darken, values above lighten. The most straightforward
thing to do is to use the paintbrush tool with the  neutral colour and use
different brushes and opacities. That way you erase details.


Compiled for Gimp-2.10 by Samj.

AUMASK - Advanced Unsharp Mask Ver.0.9.2 Win_64

 (aumask.exe)

Author:  Tibor Bamhor
 
In menu: Filters ➤ Enhance ➤ Advanced Unsharp Mask...

The purpose of this tool to provide user more control over sharpening.
 

Source code & description (*) from the author's website.
 
 ***********************************************************************************
Briew overview of capabilities:

Two types of blurring:
- Normal (simple blur, this is standard for unsharp mask)
- Selective (this is my addition, the purpose is to prevent occurence of halo effect between areas with too diferent brightness)

Four types of output:
-Sharpened image (this is expected output of this plugin)
-Mask (might be important to see when tweaking settings)
-Splitted mode (to compare the effect)
-Mask-to-img difference (for "creative" purposes)

Brightness via mask manipulation:
This tool is intended to manipulate overall brightness and/or contrast of image. Note that this tool works via unsharp mask not an actual value of individual pixels. One of effects is that this way local contrast is preserved.

Alternative colospaces:
Primarily the plugin calculates brightness with own formula, but you can switch to HSV and HSL mode to use value/lightness as a "brightness".

R/G/B channel as brightness:
This is a testing feature, it can use one of color channels as a brightness.

Introductory step-by-step guide (general notes):

Open any image and start the plugin (Filters - Enhance - Advanced Unsharp Mask). First note - preview is auto-expandable so you might want to enlarge plugin to have the preview enlarged. There is the Output combo box under the preview, please try out some of options provided there and check results in preview.

1. Simple sharpening
This is very elementary function of the plugin. It is based on sharpness equalizer. Sliders changes current distance between original and mask and each one controls own distance. Keep mouse over any slider to see actual ammount. Here with this functionality, I'm not sure if sharpness equalizer is that usefull or better then a 'single amount' sharpening. So play with sliders and play with "radius" in the right side. You should have selected "standard blur" mode. Change the view (Output mode) in previews to see an effect. My advice is to keep all sliders in the similar level. And here is an example:

2. Brightness modification:
One of controls on the right side is Brightness adjustment. This modifies brightness via mask. So the effect is that it preserves local contrast. Usually with this option you will want to compress brightness range of image. So play with those two spinboxes and blur radius as well to see the effect.

3. Selective mask - Hallo efect elimination:
I believe that you noticed "hallo" efect in areas where two areas with very different brightness met. To avoid this I'm introducting here selective mask ( see combo box in Mask Options). For now you can try Selective mask without postblur. First set Output to Mask and play with various settings - radius and treshold. Afterwards change the output to Image and try to find out if this seems usefull for you.

4. Selective mask - Contrast reduction:
Another purpose of selective contrast mask is reduction of contrast without hallo effect. Note that sharpening here is optional.

5. Selective mask with postblur:
Sometimes I noticed artifacts on "borders", so I added a "postblur" blurring to the script to soften transitions between areas. I don't have the example now, but keep in mind that such feature is there.

6. Mask-to-img difference:
Another possibility (it is up to you what you could do with it) is Mask-to-img difference. Here the output is depending on radius, type of mask, but in addition you can use controls under Mask-to-Img parameters.

 
 ***********************************************************************************
WARNING.
- do not use 'Output Mode: Split (comparison)' to get the final result, because the result will be a split layer;
- If you use the option: 'Export as new layer' (which will happen directly without terminating the plugin), end the plugin with the 'Cancel' button - because after clicking OK you will get an error:


Compiled for Gimp-2.10.32 (with a change of minimum preview = 350x350 px) by MareroQ.

Sunday, September 18, 2022

Rainbow Tone Mapping Ver.0.2 Win_64bit.

 (tonemapping.exe)

Author: Tibor Bamhor
 
Source code here.
 
In menu: Filters ➤ Artistic ➤ Rainbow Tonemap...

Gimp plugin to create surrealistic/collorfull images from your photos.
The plugin remaps original colors of your photos to strange colors.
This is not for daily use, but in some situations it can be usefull. 


Compiled for Gimp-2.10.32 (with a change of minimum preview = 400x400 px) by MareroQ.

Saturation Equalizer Ver.0.9.2 Win_64bit

 (saturate.exe)
 
Author: Tibor Bamhor
Source code here.

In menu: Filters ➤ Enhance ➤ Saturation Equalizer...

The purpose is to let user to modify saturation based on current saturation intensity.
Standard saturation (single slider/amount saturation) usually leads to oversaturation and/or undersaturation of some areas.
To address this shortcoming the Saturation Equalizer provides 6-band equalizer, where you can modify saturation based on current amount of saturation (of individual pixel). 

Additional features are:

-Brightness modification via levels,
-Temperature adjustment,
-Per-Corner brightness adjustment,
-Virtual color-based mask - lets you select color the will be affected by plugin. The slider controls how similar colors will be included into virtual mask. You can f.e. protect skin from saturating effect of the plugin,
-Auto color alighment - shifts RGB channels relatively, to make average of RGB values the same. Usefull for making snow white,
-Five internal color modes / color spaces available: Quadratic,Safe Quadratic, HSV, HSL and YUL.


Compiled for Gimp-2.10.32 (with a change of minimum preview = 400x400 px) by MareroQ.

Friday, September 16, 2022

Cartoonizer Ver. 0.8.5 Win_64bit

 Color Reducer and Cartoonizer Ver. 0.8.5
(cartoonizer.exe)

Author: Tibor Bamhor


Project & sources code: here.

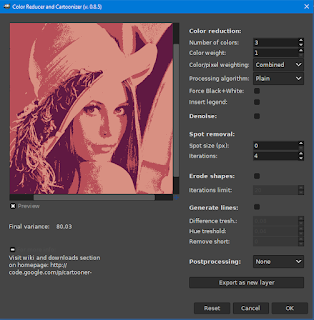
In menu: Filters ➤ Artistic ➤ Cartoonizer...

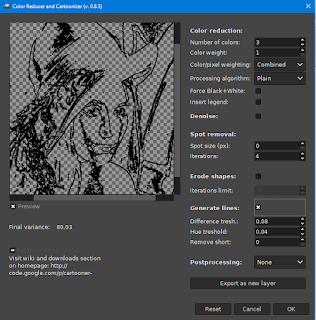
Gimp plugin, reduces number of colors and creates outlines.
Reduce number of colors (unique combinations of R,G,B) in your images.
The tools first calculates best colors than converts the image to them.
This is gimp plugin and in addition to reducing colors it denoise ('defragments') the output image and creates lines between areas of different colors. 


Compiled for Gimp-2.10.32 (with a change of minimum preview = 400x400 px) by MareroQ.