Tuesday, August 23, 2022

Custom Font Bevel Reflect BRL 1.6 V 1.10 Tabbed

 (Custom_Font_Bevel_Reflect_BRL_1_6_V_110_Tabbed.py)


Author: Skinnyhouse

 
Photos and commentary prepared by the author.


The filter can be located with the following menu path:

Filters ➤ Custom Font Tools ➤ Custom Font Bevel Reflect BRL 1.6 V 1.10 Tabbed

The desaturation option allows you to apply BRL highlights to existing custom typefaces and "Trim" allows you to trim a certain number of pixels from characters.
You can now overlay maps in different ways: randomly or by grouping characters.
You can do this both by generating maps from a selected gradient or color, and by loading a file containing the number of maps.
The plugin can load xcf files now, but only the first five layers will be used to generate the maps.
Of course, it only makes sense to use a file consisting of spherical emap layers.
You can now also save the plug-in generated maps as a new image to re-save them for future use.


Applying emaps to characters:

The default option is to apply a single emap to the complete set of characters in a custom font file.
It is no longer necessary to use a grey coloured font face – white faces now work perfectly well.
If you choose not to use emaps from a saved file, the filter will generate its own set of emaps; these will usually differ quite subtly from each other but can add a little variation to your characters.
You can still load a png emap, but greater contrast can be obtained by loading a set of saved emaps (an xcf file) consisting of up to five different layers.


Saving generated emaps:

This option provides an opportunity to save your emaps from the layers copied to a new image.

The dialog tabs:
The new option for using the outline contours is highlighted with a red outline.
New wording is highlighted in solid red.

The outline contours work better when the contour depth is set to a value of 4 or more.

The example below shows the original custom font and then with the outline (using an orange and black gradient) set to 1 - which is barely visible.
Click on the images to see a slightly more detailed view:
 
 
This set of examples show the three outline types (Outline, Ouline(Inner Bevel), Outline(Outer Bevel)) with a controur depth set to 4:
 

The last set of examples show the effect using the outlines only option:
 

REQUIRED: MLBevelReflect2 


A variation of this plug is:
Active_Layer_Bevel_Reflect_BRL_1_6_V_111_Tabbed.

 
This version only works on the active layer - regardless of the layer name.
The deprecated pdb spline callout has also been updated.


In menu: Filters ➤ Alpha to Logo ➤ Active Layer Bevel Reflect 1.6 V 1.11 Tabbed...

For discussion and comments, click here  (Gimp Chat).

Gradient From Image 1.0.1.2

 Gradient From Image 1.0.1.2
(ChangeImage.exe + Gradient_From_Image.py)


Author: Krzysztof ZajÄ…czkowski [MalyszKZ]
Source code:  Archive GIMP Plugin Registry

Gradient From Image [ChangeImage.exe], GFI for short, is a standalone program for creating gradients.
The plugin Gradient_From_Image.py ('ShellOut' by MrQ) was used to run GFI from the Gimp menu: 

Tools ➤ Gradient From Image.


The Gradient_From_Image.py plug-in saves the active layer and starts GFI.

The saved layer can be opened from the GFI menu:  

File ➤ standards file ➤ Imported from Gimp.png

 
When you click on any mouse button in the welcome window or any button on the keyboard, we will see the program interface.
The program allows you to create a gradient preview file in real time.
You can change position points and semgents of gradient and generate a gradient image file contained in the files specified in the location by selecting from the menu: file ➤ Create ➤ preview gradients file.
It is also possible to define the color of the left and right side segments. Simply right-click on the point and move the mouse to change the color on the right side of the segment.
Left click add points, or they are moving.
Double click the left mouse button will remove a point.
Removing points while holding down the Shift key allows you to keep the color and location of other points, adding points while holding down the Shift key allows you to add a point while maintaining the distribution and colors of other points.


installation:


Friday, August 19, 2022

Riot Win_64bit

 Riot 1.0.1 Win_64bit

Author: Lucian Sabo


In menu: File ➤ Save for web with RIOT...

Riot website: https://riot-optimizer.com/

Radical Image Optimization Tool (RIOT for short) is a free image optimizer that will let you to visually adjust compression parameters while keeping minimum filesize.
It uses with a side by side (dual view) or single view interface to compare the original with the optimized image in real time and instantly see the resulting file size.
In Gimp, Riot uses the active layer or a copied image (with 'Paste') but you can open other images using the 'Open' option.


Wednesday, August 10, 2022

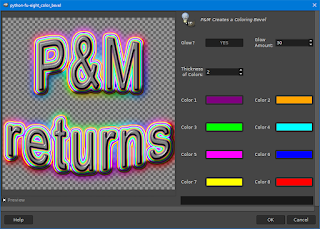
P&M Creates a Coloring Bevel.

 (P&M 8 color_bevel_atl.py)

Authors: Pocholo & MareroQ

In menu: Filters ➤ Alpha to Logo ➤8 Colors Bevel...

Inspired by Conbagui tutorial "Color Bevel Text" found here.
 
 Ver. 1.0
The main part of the code comes from color_bevel_text_V2.py by Pocholo.


Ver. 2.0
(12/08/2022)
Change:
-add options "How many colors to use";
-bugfix when starting image has more layers.


 Plugin requires LayerFX-2.10.py (included in attachment).

Ver. 3.0
(23/08/2022)

Change:

-for each color, add a choice of thickness and offset,
-for 'Bevel', add the 'Bevel Size' option.