(aumask.exe)
Author: Tibor Bamhor
In menu: Filters ➤ Enhance ➤ Advanced Unsharp Mask...
The purpose of this tool to provide user more control over sharpening.

Source code & description (*) from the author's website.
***********************************************************************************
Briew overview of capabilities:
Two types of blurring:
- Normal (simple blur, this is standard for unsharp mask)
- Selective (this is my addition, the purpose is to prevent occurence of halo effect between areas with too diferent brightness)
Four types of output:
-Sharpened image (this is expected output of this plugin)
-Mask (might be important to see when tweaking settings)
-Splitted mode (to compare the effect)
-Mask-to-img difference (for "creative" purposes)
Brightness via mask manipulation:
This tool is intended to manipulate overall brightness and/or contrast of image. Note that this tool works via unsharp mask not an actual value of individual pixels. One of effects is that this way local contrast is preserved.
Alternative colospaces:
Primarily the plugin calculates brightness with own formula, but you can switch to HSV and HSL mode to use value/lightness as a "brightness".
R/G/B channel as brightness:
This is a testing feature, it can use one of color channels as a brightness.
Introductory step-by-step guide (general notes):
Open any image and start the plugin (Filters - Enhance - Advanced Unsharp Mask). First note - preview is auto-expandable so you might want to enlarge plugin to have the preview enlarged. There is the Output combo box under the preview, please try out some of options provided there and check results in preview.
1. Simple sharpening
This is very elementary function of the plugin. It is based on sharpness equalizer. Sliders changes current distance between original and mask and each one controls own distance. Keep mouse over any slider to see actual ammount. Here with this functionality, I'm not sure if sharpness equalizer is that usefull or better then a 'single amount' sharpening. So play with sliders and play with "radius" in the right side. You should have selected "standard blur" mode. Change the view (Output mode) in previews to see an effect. My advice is to keep all sliders in the similar level. And here is an example:
2. Brightness modification:
One of controls on the right side is Brightness adjustment. This modifies brightness via mask. So the effect is that it preserves local contrast. Usually with this option you will want to compress brightness range of image. So play with those two spinboxes and blur radius as well to see the effect.
3. Selective mask - Hallo efect elimination:
I believe that you noticed "hallo" efect in areas where two areas with very different brightness met. To avoid this I'm introducting here selective mask ( see combo box in Mask Options). For now you can try Selective mask without postblur. First set Output to Mask and play with various settings - radius and treshold. Afterwards change the output to Image and try to find out if this seems usefull for you.
4. Selective mask - Contrast reduction:
Another purpose of selective contrast mask is reduction of contrast without hallo effect. Note that sharpening here is optional.
5. Selective mask with postblur:
Sometimes I noticed artifacts on "borders", so I added a "postblur" blurring to the script to soften transitions between areas. I don't have the example now, but keep in mind that such feature is there.
6. Mask-to-img difference:
Another possibility (it is up to you what you could do with it) is Mask-to-img difference. Here the output is depending on radius, type of mask, but in addition you can use controls under Mask-to-Img parameters.
***********************************************************************************
WARNING.
- do not use 'Output Mode: Split (comparison)' to get the final result, because the result will be a split layer;
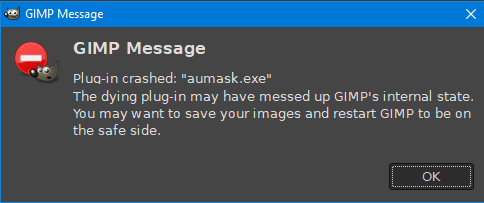
- If you use the option: 'Export as new layer' (which will happen directly without terminating the plugin), end the plugin with the 'Cancel' button - because after clicking OK you will get an error:
- do not use 'Output Mode: Split (comparison)' to get the final result, because the result will be a split layer;
- If you use the option: 'Export as new layer' (which will happen directly without terminating the plugin), end the plugin with the 'Cancel' button - because after clicking OK you will get an error:

Compiled for Gimp-2.10.32 (with a change of minimum preview = 350x350 px) by MareroQ.
No comments:
Post a Comment
Keep the tone of your comments civil and courteous. Keep in mind that there are no authors of plugins and scripts manning this site. Any comments posted for help or requests may go unanswered. Go to GimpChat.com and do a search instead.