MrQ Gimp-Batch
(MrQ Gimp-Batch.py)
Ver.0.1 (19/09/2021)
Author: MareroQ
Contributors for operations GEGL in Python :
Kevin Payne & Claude Lion
In menu: Tools -> Batch convert...
For those who have trouble (or reluctance) to use Console or ImageMagic or you want to use GEGL filters (which the great BIMP does not yet support), this plug-in can make batch processing a little easier without needing to open files as a layers.
Plugin based on the idea of:
- TinTran Run Code on Visible Layers Script for GIMP & here
and
- Saul Goode (Sg-Combine-Bg.scm - popular for animation, watermark or signature).
Be careful of:
- the possibility of losing metadata due to the possibility of using three types of files (bmp, jpg, png - which type opens, it saves it),
- size and type of overlay file (usually png with alpha channel - e.g .: for watermark or signature),
- it is possible to overwrite files (without warning) so try to select "Output Folder" empty,
- for Gegl Recommended for reading: Learn GEGL graph (Gimp Tutorials) by cli345 -> http://gimpchat.com/viewtopic.php?f=10&t=19463
Example custom code:
# for PDB:
pdb.gimp_image_scale(image, 250, 250)
(comment: scale the image using the default interpolation method. New image width=250 New image height=250)
pdb.plug_in_autocrop(image ,layer)
(comment: remove empty borders from the image)
# for script-fu:
pdb.script_fu_fuzzy_border(image ,layer ,(255,255,255),16,1,4,0,100,0,1)
pdb.script_fu_old_photo(image, layer, 1, 20, 1,0,0)
# for GEGL:
gegl_batch(image, layer, "cubism");gegl_batch(image, layer, "alien-map") <=or=> gegl_batch(image, layer, "cubism alien-map")
Basic syntax:
gegl_batch(image, layer, 'operations')
List of operations with parameters here.
# for Python:
pdb.python_fu_foggify(image, layer, "", (240,180,70), 1,100);
pdb.gimp_image_merge_visible_layers(image, 0)
comment: Plugin Fog finishes working with two layers you need to combine them - so you need to add a procedure pdb.gimp_image_merge_visible_layers
# for G'MIC
pdb.plug_in_gmic_qt( image, layer,1,0,'samj_Angoisse 1,5,0,5,100,2,4,1,250')
You can combine these operations into one command (separating them with a semicolon).
Here is an example of creating fancy seamless patterns:
pdb.plug_in_gmic_qt( image, layer,1,0,'deform 60.7');pdb.plug_in_gmic_qt( image, layer,1,0,'samj_Angoisse 1,5,0,5,100,2,4,1,250');pdb.gimp_image_scale(image, 250, 250);gegl_batch(image, layer,'tile-seamless')
Sample result:
sample_lena.png
sample_flower.png
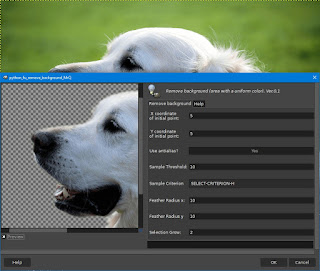
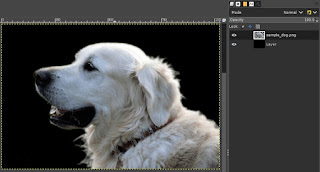
sample_dog.png
How to use plugin (YouTube video) thanks 🙏 to
Rich2005 -
here.
Ver.0.2 (23/09/2021)
Changes:
- bug fix for load bmp file,
- add options: Change output extension.
Ver.0.3 (02/10/2021)
Changes:
Add options: Load all files Automatically Detected for Gimp without Raw files (it can be used as a converter of various types of files).
Ver.0.4 (09/10/2021)
Changes:
Add options: load Custom Code from file in the home directory: .../plug-ins/Actions-Presets/
How to create and use Actions-Presets see also here.
One of the ways to save the code:
Bugfix for: "Operation: CONVERSION ONLY"
(18/02/2023)
Ver.0.5 (23/05/2023)
Changes: - the division into extension types has been abandoned (now it always requires entering a new type of extension to save),
- added option to save with your own code, because the default save settings in Gimp don't always suit users. However, this requires the use of a PDB.
Examples custom code for save:
Example 1.
We want to save the jpg files to reduce the size with quality = 60 (default=90)
We search in PDB:
pdb.file_jpeg_save(image, drawable, filename, raw_filename, quality, smoothing, optimize, progressive, comment, subsmp, baseline, restart, dct)
For Custom code always replace:
drawable ➤ layer
filename ➤ outputPath
raw_filename ➤ outputPath
Other values according to your choice (based on Parameters information from PDB)
Our code might look like this:
pdb.file_jpeg_save(image,layer,outputPath,outputPath,0.60.0,1,1,0,"",2,1,0,0)
The extension type must match your own code used.
Example 2
Save as png with selected compression
PDB
pdb.file_png_save(image, drawable, filename, raw_filename, interlace, compression, bkgd, gama, offs, phys, time)
Custom code:
pdb.file_png_save(image,layer, outputPath, outputPath, 0, 7, 0, 0, 0, 0, 0)
Example 3
Save as dds with selected compression:
PDB:
pdb.file_dds_save(image, drawable, filename, raw_filename, compression_format, mipmaps, savetype, format, transparent_index, mipmap_filter, mipmap_wrap, gamma_correct, srgb, gamma, perceptual_metric, preserve_alpha_coverage, alpha_test_threshold)
Compression format (0 = None, 1 = BC1/DXT1, 2 = BC2/DXT3, 3 = BC3/DXT5, 4 = BC3n/DXT5nm, 5 = BC4/ATI1N, 6 = BC5/ATI2N, 7 = RXGB (DXT5), 8 = Alpha Exponent (DXT5), 9 = YCoCg (DXT5), 10 = YCoCg scaled (DXT5))
Custom code:
pdb.file_dds_save(image, layer, outputPath, outputPath, 7, 0, 0, 0, 0, 0, 0, 0, 0, 0, 0, 0, 0)
Ver. 0.7
(20/06/2023)
- added tabs,accept special national characters in the filename for ,CONVERSION ONLY using GIMP;
- for RAW file add "CONVERSION using ImageMagic" (does not accept national characters in paths and filename)
Download: ImageMagick-7.1.1-11 https://imagemagick.org/script/download.php#windows
Ver. 0.8
(15/07/2023)
Change:
- moved ImageMagick (IM) to a new tab,
- added "Use 3 digit numbering?" and "Custom" code option to IM (however, its use requires plugin editing) and display in Gimp,
- non-ASCII character problem partially solved for IM (displaying when OUT path contains non-ASCII characters is not working)